WEEK 1 OBJECTS
TUTOR Andrew Farrington.
In this module we will be learning about studio techniques, camera operation/format, studio accessories and backdrops,image import and organisation, manipulation and corrective processes. Types of object photography include still life , 'packshot', macro and miniature
week 1: 26,09,2011
This week was an introduction .
Perfume Bottle Images.


. kelvins : measurement of temperature.
. pack shots : is a still or moving image of a product, including packaging and labelling and is usually used for advertising or other media.
. pech-kucha or 20/20 : is a small presentation of your own 20 images, each image is 20 seconds per image. In this short time you have to talk about the image .
'iso' . Is a scale for measuring sensitivity to light, but digital cameras control this automatically.
We were also shown a gallery from:
BALAKA - Mini valley.
Next week's task is to take a picture of a perfume bottle. I will be shooting the bottle in a variety of lighting situations. We were told to bring a camera and a card reader, which I had to borrow, but I did buy an external hard drive, which didn’t know how to work.
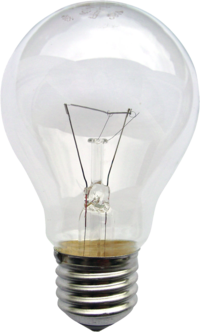


The incandescent light bulb, incandescent lamp or incandescent light globe makes light by heating a metal filament wire to a high temperature until it glows. The hot filament is protected from air by a glass bulb that is filled with inert gas or evacuated. In a halogen lamp, a chemical process returns metal to the filament, extending its life. The light bulb is supplied with electrical current by feed-through terminals or wires embedded in the glass. Most bulbs are used in a socket which provides mechanical support and electrical connections.www.incandescent.com
LIGHTING UNIT

The Grid Diffuser gives a pool of direct light in the centre, surrounded by soft-diffused light. The ratio between the centre and edge is 3:1 — ideal for portrait applications.
The Grid Diffuser gives a pool of direct light in the centre, surrounded by soft-diffused light. The ratio between the centre and edge is 3:1 — ideal for portrait applications.
WEEK 2 : 5,10 211
Today I shot in a variety of lighting situations:
Daylight or natural lighting which I took several pictures outside the university building.
Fluorescent or artificial light which I just took inside the building.
Tungsten which is a lighting unit that can be angled in variety of ways.
Flash which is on the camera or free standing.
The first hour I took pictures inside the studio and outside the building. The second hour I had to use lightroom or aperture, to create a catalogue and import images on to my hard drive, then select my best images and upload them to flickr. I had to make sure that I re-sized the image and altered the brightness and contrast of the image.
I found it difficult getting to understand the new camera and to use the lighting in a way to get the best image. I tried my best, but had very little support. The second hour we had to download all the images which was a total blur as I have no understanding of a mac computer. I did get some support from Andy and Kelly.
WEEK: 3 12.10.2011
Perfume Bottle Images.
This week we showed our 20/20 presentation. I think the class did really well but mine turned into a car crash after looking at the same picture over and over in different lighting situations. It was some what boring . I'll make sure that it's a bit more varied next time. I enjoyed doing the presentation - I just need to read and understand the brief better in future.
These two pictures were done at home using a mirror and one light coming from the right. These are my best images compared to he studio images.

F14, ISO: 800 Exposure ,800, A/P

F 5.3 IS0: 400 Exposure 1/150 A/P.

This is my studio images in natural lighting, looking back I still have a lot more to learn about , copy lighting and 45/45 .

These is also done with natural lighting again it didn't turn out the way I wanted. These because I had no idea about lighting what so ever.

Kodak Easyshare M320 camera. F 2.8 ,ISO 80. Exposure 1/200
This picture below is my first ever picture captured in my home made light- tent. Light is coming from the back and to the left, with some natural light
.
F5.5 ISO: 400 ,Exposure 1/100 ,A/P.
This is my first ever picture capture in my home made light- tent.Light is coming from the back and to the left, with some natural lighting.


F5.4 ,ISO:400, Exposure 1/320.Manual setting.
.
This is shot in my light box using light from above and the sides. I was trying to get definition on the glass and the water drops on the apple to stand out.
.
This is my home made light box. It only cost £1 for the pva glue and two small lamps cost £3.50 each.

This is laser heads shot in my light box.
F 5.6 ,ISO:400, Exposure, 1/320, manual setting.

This is ice shaped from a plastic bottle .I just cut off the plastic top and placed it on top including the label.
What is the difference between macro, micro and closeup photography?
There is often much confusion amongst new photographers over the terms macro, micro and close up photography and how they differ. For starters, macro and micro usually refers to the same thing, in that Nikon names their range of ‘macro lenses’ with the word ’micro’. Canon on the other hand, calls them macro lenses.
What does macro and micro refer to when it comes to photography?
The word macro means big, whereas the word micro mean small. So how is it that these two terms related?
These picture below are an example of Macro photography.
These picture below are an example of Macro photography.

This is some extra work in the studio set by Katy to help me understand how to us ,different apertures and lighting, I borrowed a camera and macro lens from techno Kevin, and just took pictures on different f stops, and iso,s I really enjoyed learning how to set up the studio lighting and getting us to the settings on the camera. I must say I did us it in the wrong way at first meaning I should of got closer to the object to get the full us of the macro lens. All the lighting came from TUNGSTEN LIGHTING UNIT one under the table and one on the left and right also the white balance was set on to day light though out the shoot.

f stop 14 iso 400


f stop 4 iso set at 100


. Today we spoke about what this module out come is.
. Visiting National Museum 'Danavon Wiley' .
. Research other photographers. such as Andre Kertesz, Edward Weston, Nick Knight, Andy Goldworthy, Susan Derges.


Nick Knight Lady Gaga
This is one of my favourite photos from Nick Knight collection I love the mystery of not knowing who the person is and the way the the dress just flows.
week: 5 2,11,11
This week Andy took the class in the studio to show use different types of exposures ,and lighting e.g 45/45 . We were also shown 1.1 ,1.2 ,1.3, 1.4, lighting and how it strengthens different parts of the face. I was the model so I didn't get a chance to look at the different types of lighting but I will be booking the studio next week so I will have a better ideal of lighting . I really enjoyed the class today for the first time and I got a great handout on exposures just wish that I got this a few weeks ago.
Week :6 9.11.11
This weeks brief was about high key and low key lighting. We went into the studio and took several shots in different lighting with the soft box and continues lighting with 45/45.We used the light meter every time we moved the lights to make sure that the camera was on the right setting.. It did take a while to get use to . so I feel more confident in the studio and , I have learnt more about the light meter and the auto flash because I never used one before .
Studio Lighting
.
Studio lighting can be broken down into two categories, continuous and flash. While continuous lighting has two main advantages there are many disadvantages.
The good points of continuous light:
- It's inexpensive, and makes a good starting point for anyone on a small budget.
- You can see what the light is doing and where the shadows and highlights are.
- It generally produces more heat than light, very uncomfortable!
- The light that it produces is not balanced to daylight.
This can be overcome in three ways: Firstly, you can use tungsten balanced colour film. Secondly, you can put a filter on your lens, which will enable you to use any daylight film.
The big problem with these two solutions is that as the tungsten filament in the bulb burns it leaves a small residue on the inside of the glass envelope. This means that the colour of the light gradually becomes more yellow as the bulb ages. If you are using print film or shooting digitally any colour cast can be rectified when printing, but slides cannot!
The third way is simply to shoot in black & white!
This brings us to flash.
With a normal on-camera flashgun there is no way of knowing what the lighting effect will be, except to say that if you are using it fitted on the camera - it will be pretty awful!
The advantages of studio flash are - modelling lamp, consistency, power and control.
Lets look at these one at a time.
Modelling LampStudio flash units are fitted with a continuous lamp, which can be seen on this photograph sitting in the centre of the circular flash tube. Because of its position it gives a very accurate indication of the angle and quality that the flash will produce when fired. This makes your lighting easy to set-up, because'what-you-see-is-what-you-get'.
As this lamp is relatively low powered you don't get the heat or brightness problem we talked about with continuous light. The only thing to remember is that the flash will be a much stronger light, so the shadows will be darker and the highlights will be lighter. To trick your eye/brain built-in compensation device when setting up lighting, first close one eye (a camera only has one) then squint through your lashes. This has the effect of increasing the contrast level you can see and is much more like what the camera will record. Don't forget to
tell your model what you are doing or they might think you rather strange!
Consistency
Remember how we said that as a tungsten bulb burnt it got more and more yellow? Well with flash every time you press the shutter the colour of the light from the flashtube is balanced to daylight. This means that you can use any film you like without the need for filters, even with slide film - no problem.
Power
Modern flash units give huge amounts of power, released in a fraction of a second (typically with a unit such as an Elinchrom this is around 1/2500th second!). For most home users a unit with a power of 250, 300, 500 or 600 watt/seconds is usually sufficient. Watt/seconds or Joules (the same thing) is the measure of the power that a flash unit can produce. Don't get confused with guide numbers, this changes by changing the accessory on the front! A 300 w/s unit is half the power of a 600 w/s unit, which is exactly 1 f-stop. So if your 600w/s unit was set up two metres from your subject and you were getting a flashmeter reading of f/16, then a 300w/s unit in the same place would give a stop less at f/11. We will cover what a flashmeter is and how it should be used in a later article.
Control
It's all very well having lots of power, but it's no use if you can't control it! Even the most simple and inexpensive studio flash units have at least a 'full/half power' switch, most will offer much more control. Remember, we said that if you turn a flash head down to half power you are reducing the output of the light by exactly 1 f-stop. Smaller reductions in power with a simple head are obtained by moving the head further away, or closer for more power. Just remember the Inverse Square Law which basically means that if you move your light source twice as far away, you will lose two f-stops of exposure. e.g. Our head is one metre from our subject, using ISO100 film we are getting an exposure of, say f/16. If we move the head back to two metres away our exposure will be f/8, - two f-stops less.
www.ephotozine.com/article/studio-lighting---a-beginners-guide-to-studio-lighting-132
Week :7
These pictures below were shot on a Nikon D60 in the studio with copy lighting (soft box) in my own time I really stuggled to get the setting right ,so they all ended up looking out of focus and over exposed and flat . I have learnt now that I should take a light meter when I am doing studio work and to use auto flash linked from the camera to the light.


F 3.5 , ISO:100 ,Exposure 1/100 ,A/P
These pictures below were shot the day after I shot the pictures above(two Flowers in a vase). I quickly learnt about auto flash and light metering . I was really pleased with some of the pictures. I still feel that I have to spend more time in the studio to understand more about light meter reading and auto flash.
HIGH KEY

This is taken with a Nikon D60 taken on manual setting.
F:11 , Exposure :1/125 . ISO: 100 .
HIGH KEY

This is taken with a Nikon D60 taken on manual setting.
F:11 , Exposure :1/125 . ISO: 100 .
HIGH KEY

This is taken with a Nikon D60 taken on manual setting.
F16, Exposure :1/125 ,ISO:100.
LOW KEY

This is taken with a Nikon D60 taken on manual setting.
F5.6, Exposure: 1/60, ISO: 100.
LOW KEY

This is taken with a Nikon D60 taken on manual setting.
F:11 , Exposure :1/125 . ISO: 100
All these pictures below were shot on a Nikon D60 in at home with a black Velvet cover with the light coming from the left. On a slow shutter speed than I turn the camera around to get this affect.

F 22 ISO :200 exposure 8/3ev, manual setting.

F11, ISO 200, Exposure 8/3 ev ,manual setting. This was done on a slow shutter speed with the light coming from underneath.

F11, ISO 100, Exposure 8/3 , manual setting.
week:8
These are my museum images.
I found that I had to keep changing my setting all the time because of the the different types of lighting in the museum and most of the objects where behind glass cabinets.The images where difficult to do because some had spot lights directed at them.


the pictures below had to be taken though glass on a 45 degree angle to stop the reflection on the bouncing of the glass.


These are my very best set of 6 images done at home. It shows that I have gained better understanding of light and shadow and how lighting plays a vital role in producing a commercial product. At first I placed these make-up products on glass and lite it from underneath under. I found that the ice was overexposed and the product was under exposed. This is why I changed the way I set it out my using 45/45 lighting a mirror, glass diamonds and decanter.
I also made a check list so that I could get great images.
. ISO
. Aperture settings.
. Shutter speed.
. White balance.
. Flash/ auto.
. Manual settings.
. What source of lighting I was going to use.
. Composition.
. Using objects along side the product ( narrative context).


These are the make up products that I placed on to glass which didn't turn out well as I thought they would.


These are other ice sculptures made to order.
%20FF%20Table%20Swan.jpg)
%20FF%20Prawn%20Server.jpg)
%20FF%20Sorbet%20Palette.jpg)

Week: 9.
Reflective Surfaces.
These images are my Reflective Surfaces. They turned out better than I thought, because I thought they would get some reflection from the camera. I didn't take the picture straight on , I took the image on a angel to prevent flare.


F7.1 ,ISO: 100 Exposure,1/100, A/P
Week : 11
Mini set.
These are my images for the mini set. I used my Kodak Easyshare M32 camera which automatically sets the F. stops, ISO,shutter speed, white balance,and flash.. The theme was 'Santa,s day Off ' and how Santa would like to spend his day. The back drop was white blow vinyl wallpaper to represent snow. I used 45/45 lighting with some natural light. At first I thought it would take me along time to do the images but it was easy to set up the lighting and I know how hard it was before to take images on my frozen make-up which was mainly plastic containers. Every picture was set on auto white balance.


F.Stop 2.8 , ISO, 120, shutter speed 1/60: Santa in a wheel chair.


F.Stop 4.1 , ISO, 121, Shutter speed, 1/80. Santa pushing a pram while drinking.

F.Stop 4.1 ISO, 1/30, Shutter speed, 1/30: Santa drunk with the baby tyring to get out of the pram.

F. Stop.4.1, IOS, 1/30 ,Shutter speed 1/30: Santa drunk and the baby has fallen out of the pram.

F.Stop 3.6. ISO,1/60, Shutter Speed, 1/40.. Santa with the baby on a see-saw.

F.Stop 3.6, ISO, 80, Shutter speed 1/80: Santa riding horse with the baby standing on the pram.

F.Stop 3.6, ISO, 80, Shutter speed 1/80: Santa and baby out of their pram and wheelchair.

F.Stop 3.6, ISO, 92. Shutter speed1/80: Santa sitting on Barbies knee.