SYSTEM AND PROCESSES
This module provides a practical starting point, giving opportunities for the student to experience the working practises of the photography department. Its aims are to provide a planned curriculum depended on students experience and expertise when entering the course.
TUTOR : Richard Peregrine
Week 1: 26,09,2011
We were told to take three pictures of Blackburn on fresher week to be shown in week 1. I displayed my pictures on PowerPoint so the whole class could see them and that I could get some constructed criticism.I really enjoyed looking at other students work and getting feedback so I could further develop my own skills, and put them in to practise. We also talked about the' Golden hour'

Picture of a sign post taken on the Leeds Liverpool canal.

This is a picture of a gate on East Park Road.

This picture was taken from the Leeds Liverpool Canal . I just thought this was funny because it just looks like the car going into the wall ,looking back I should of placed the wheelie bins laying down to give it a better effect.
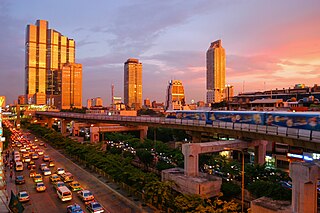
This is the Golden hour.
Golden hour- also known as the 'magie hour' one hour before and after sunset and sunrise. There is more of a blue light is during this time which appears reddish in the sky which also produces longer shadows.
During the rest of the day the sun can create a really bright light which produces dark shadows.
we also discussed the importance of of three mine elements which are:
. Juxtaposing
. Decisive moment.
.Visual irony
I really like Banksy work its very similar to JR the artist they are both political activists and both us visual irony in a strange sense of humour. Banksy uses stencilling techniques were Jr uses photos. Banksy was born in 1974 in Bristol, a trained butcher and the son of a photocopier technician.Known for his contempt for the government in labelling graffiti as vandalism
According to my research Banksy got involved with griffiti art during the aerosol boom in the early 80,s but was comparedto a France man called Blek le Rat also a stencil artist whom was a member of the anarcho punk band Crass whom are still active today. Banksy does not sell photos of street graffiti.

Week 2: Lecture 6,10,2011
This week was very informative for me as I’d have much understanding of the functions on the camera. The talk was based on a Nixon FM manual camera. We discussed the importance of taking a picture and its main functions for getting the best results; FILM SPEED , ‘ISO’, SHUTTER SPEED, APERTURE SIZE , EXPOSURE, FOCUS, FRAME AND CAPTURE.
.A photographer adjusts ISO,aperture and shutter to suit the photograph.
. Basically ISO is set to suit the general light level.
.Aperture determines depth of field.
. Shutter determines capturing movement.
. You decide what that priority is
.A photographer adjusts ISO,aperture and shutter to suit the photograph.
. Basically ISO is set to suit the general light level.
.Aperture determines depth of field.
. Shutter determines capturing movement.
. You decide what that priority is
Shutter and aperture are inversely proportional, I learnt that as one increases the other decreases .Photographers call these ‘STOPS’. ISO’S are used for lighting levels which can be set on auto or manual this depends on the image you are shooting.
Program (P) is for when you just want to take pictures of family and friends or holiday shots and it over ride the settings
Manual (M) The settings are your call depending on your requirements for the final look of the image,manual adjustment is for aperure and shutter speed. This is great for landscape, urban , still life ,objects and portraits .
HOW THE INSIDE OF A CAMERA LOOKS LIKE


Single Lens Reflex (SLR) is a complicated term for a complicated machine. It refers to the prism and flip-up "reflex" mirror system that allows users to accurately focus and frame their shots directly through a camera's optics, rather than through a separate viewfinder. Until recently, most SLRs were the province of pros, requiring experience and training to master. But the digital era has created a new, growing class of consumer-grade digital SLR (DSLR) cameras that are easier to learn and use, yet still deliver pro-level photos. These days, the most complicated aspect of DSLR cameras is figuring out which one fits your needs.
HOW THE INSIDE OF A CAMERA LOOKS LIKE
Single Lens Reflex (SLR) is a complicated term for a complicated machine. It refers to the prism and flip-up "reflex" mirror system that allows users to accurately focus and frame their shots directly through a camera's optics, rather than through a separate viewfinder. Until recently, most SLRs were the province of pros, requiring experience and training to master. But the digital era has created a new, growing class of consumer-grade digital SLR (DSLR) cameras that are easier to learn and use, yet still deliver pro-level photos. These days, the most complicated aspect of DSLR cameras is figuring out which one fits your needs.
1. LCD Display
Like most digital point-and-shoot cameras, digital SLRs have LCD displays--the largest of which are 3 in., diagonally. Older-model DSLRs didn't let you preview your shot using the LCD. Newer cameras with "live view" functionality leave the shutter open and allow light to bypass the reflex mirror. With most of these cameras, users have to choose between framing shots with the LCD or the viewfinder.2. Sensor
DSLRs have image sensors that are 10 to 20 times the size of sensors on point-and-shoot cameras. This gives DSLRs far superior light sensitivity, which is arguably more important to overall image quality than megapixels. Most DSLR cameras can vibrate the sensor to remove dust particles that often enter the camera when changing lenses.3. Memory
CompactFlash memory cards used to be the data storage capacity kings, but the far more popular Secure Digital High-Capacity (SDHC) format now has cards with up to 32 GB, and newer DSLRs are trending toward it.4. Battery
Long battery life is critical for DSLRs, which have lots of motors and powerful flashes. Most DSLR batteries are good for a full day's shooting. If you require more, we suggest you buy an extra.5. Flash
Consumer digital SLRs come with a pop-up flash. Advanced users will want to take advantage of the hot shoe, which allows the use of more sophisticated, synchronized--flash accessories.6. Shutter
DSLRs are known as fast-shooting machines, with shutter lag measured in tenths or hundredths of a second and burst modes from 2.5 to 10 frames per second.7 Lens
When you buy a DSLR, you're buying part of a larger system. Most DSLRs can be purchased as a kit that includes an all-purpose zoom lens. But manufacturers also sell dozens of specialized lenses that can transform the performance of your camera. These days, lenses pack almost as much technology as the camera itself.+ Autofocus
It's powered by the camera battery, but all the gears and motors are built into the lens. The lens interfaces have changed over the years, so many new cameras won't work with old auto focus lenses.+ Image Stabilization
Many modern lenses come with a mechanical system that counteracts camera shake and reduces blur. On some lenses, it
Reference:
PORTRAITS
All these pictures were shot on a Nixon D60 on f 5.6 looking back it could of been even better on a lower f stop and ISO.


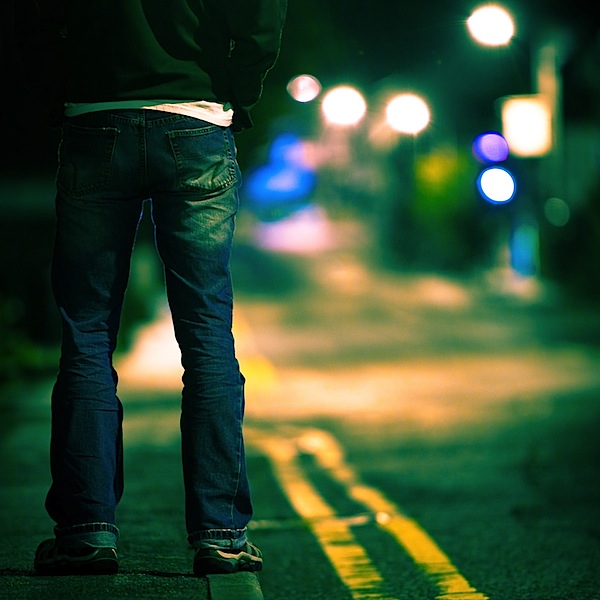
SHALLOW DEPTH OF FIELD.
Some of the most important styles of photography that you'll want to use Shallow DOF are portrait photography and photojournalism. It is a helpful tool to use for story telling and as in all other uses it brings attention to where you want it. Imagine a natural setting where a person picks a flower and sniffs it with a childish smile on their face. You can use shallow Depth of Field in many ways'
The basic formula for shallow Depth of Field is to get as small of an f-stop setting as you can reasonably get away with in your photo. The smaller the f-stop, the larger the aperture. The aperture basically works the same way your pupils do, the more dilated it is, the more background is blurred. A good technique for getting shallow DOF is to start with the smallest f-stop your lens will allow. 2.8 or better works well for this style. A good way to experiment with a digital camera is to set your camera to its smallest f-stop, take a picture, increase the f-stop by about 1 stop, take .
(www.emmettlollis.com/tutorials/digitalphotography/shallow-depth-of-field.php)
 shallow depth of field
 shallow depth of field

shallow depth of field

Mark Seliger pictures.
WEEK :4
This weeks project is about landscape and hyperfocal distance and the meaning of aesthetic which means a new way of seeing things ,putting your spirtual, visual self into the picture.
The format is:
No camera shake.
Black and white landscape.
All subjects in depth of focus.
Shutter speed slower than 1/30.
Good compostion.
Interesting Location.


hyperfocal distance


This Micheal Kenna is an English photographer born 1953.He is best known for his black and white landscapes. He mainly uses Hasselblad medium format and halga camera and the 'Golden Hour' rule. I really like this picture because of the definition in the sky breath taking.


.


Week : 6 8.11.2011
This weeks brief is to photo a vase of flowers .We were told that that we can us macro if we wish. I,ll be using a primary lens and hyperfocal distance . Manual exposure should be used on the camera take a tripod and that the subject is composition is right . This weeks lecture Richard talked about ;
.
. Robert Mapplethorpe.
. Charles Bowman.
. Andre Kertesz.
. Colour temperature rang .
. Look at at books like 'Flora Photographic.

WEEK :4
This weeks project is about landscape and hyperfocal distance and the meaning of aesthetic which means a new way of seeing things ,putting your spirtual, visual self into the picture.
The format is:
No camera shake.
Black and white landscape.
All subjects in depth of focus.
Shutter speed slower than 1/30.
Good compostion.
Interesting Location.
The concept of hyperfocal distance is easy to understand: focus a lens at the hyperfocal distance and everything in the photograph from some near distance to infinity will be sharp. Landscape photographs are often taken with the lens focused at the hyperfocal distance; near and distant objects are sharp in the photos.
Application of the concept leads to many questions: Which lenses are best for using hyperfocal distance focusing? What is the hyperfocal distance for a lens? How do I focus at the hyperfocal distance? Do I have to focus exactly at the hyperfocal distance? In this article we'll look at the basics of using hyperfocal distance to maximize depth of field in a photograph.
Hyperfocal Distance Definition
hyperfocal distance

Dessert clouds,Merzouga ,Morocco:1996.
Ansel Adams: The Tetons and Snake River.
Ansel Adams
Week :5
This week we put are picture up on to the power point. All the pictures were set at f,16, ios 200, 1/30 shutter speed ,white balance on daytime.


Week :5
This week we put are picture up on to the power point. All the pictures were set at f,16, ios 200, 1/30 shutter speed ,white balance on daytime.


Week : 6 8.11.2011
This weeks brief is to photo a vase of flowers .We were told that that we can us macro if we wish. I,ll be using a primary lens and hyperfocal distance . Manual exposure should be used on the camera take a tripod and that the subject is composition is right . This weeks lecture Richard talked about ;
.
. Robert Mapplethorpe.
. Charles Bowman.
. Andre Kertesz.
. Colour temperature rang .
. Look at at books like 'Flora Photographic.
Robert Mapplethorpe

Robert Mapplethorpe.


Andre Kertesz.
Colour temperature settings.

White Balance and Colour Temperature.
The light that falls on your subject in the morning is not the same as the light at midday and that light will depend on the weather conditions. The colour temperature of light is measured in degrees Kelvin and can range from cool to warm casts of white light where candle light has a temperature of approximate 1900, tungsten photographic lights 3200, and overcast sky 6000. The human eyes are capable of adjusting to changes in colour temperature. The following table below gives the approximate colour temperature for different lighting conditions / times of day. (answers.yahoo.com/question/index?qid.)
| Blue sky | 9000 - 1200 |
| Shade from blue sky | 7500 |
| Shade from party cloudy sky | 7000 |
| Shade from daylight | 6500 |
| Overcast sky | 6000 |
Sunlight (noon, summer, mid-latitudes)
|
5500
|
Electronic photo flash
| 5500 - 5600 |
Sunlight (early morning and late afternoon)
| 4500 |
Hour from dusk/dawn
|
3500
|
Professional tungsten photographic lights
|
3200
|
Sunlight (sunrise or sunset)
|
2000
|
WEEK: 7 14.11,11
This week we are showing are photos from are brief ' flowers in a vase.'


week : 7
This weeks we were asked to shoot a typical scene of ' Great Britian'. We discussed what is great British and have we can show this in our photography . This can be shown through sports , Language, culture, industry and invention.
E -6 PROCESS
The E-6 process (often abbreviated to E-6) is a chromogenic photographic process for developing Ektachrome, Fujichrome and other colour reversal (slide) photographic film.
Unlike some colour reversal processes (such as Kodachrome K-14) that produce positive transparencies, E-6 processing can be performed by amateurs with the same equipment that is used for processing black and white negative film or C-41 colour negative film. The process is sensitive to temperature variations; a tempered water bath is recommended to stabilize the temperature at 100.0 °F for the first developer and first wash to maintain process tolerances.
History
The E-6 process superseded Kodak's E-3 and E-4 processes. The E-3 process required fogging with light to accomplish image reversal and produced transparencies that faded quickly. The E-4 process used polluting chemicals, such as a highly toxic reversal agent Tertiary Butyl-Amine Borane (TBAB). Process variations
There are two versions of the E-6 process. Commercial laboratories use a six-bath chemical process. The 'hobby' type chemistry kits, such as those produced by Tetenal, use three chemical baths that combine the colour developer and fogging bath solutions, and the pre-bleach, bleach and fixer bath solutions. The three-bath process has a discrete colour developer step in between. However, the three-bath version of the process suffers from poor process control, with colour shifts and colour crossover, mainly because of insufficient bleaching, fixing or both in the bleach-fixer ("blix") stage.
C 41 PROCESS
C-41 is a chromogenic color print film developing process. C-41, also known as CN-16 by Fuji, CNK-4 by Konica, and AP-70 by AGFA, is the most popular film process in use, with most photoCfinishing labs devoting at least one machine to this development process.
Processed C-41 negatives, as with all colour films, consist of an image formed of dye. Due to the long-term instability of dyes, C-41 negatives can fade or colour-shift over time. This was a significant problem with early films; whether the newer films are archival or not is a subject of some debate.
Film layers
C-41 film consists of an acetate or polyester film base, onto which multiple emulsions are coated. Each layer is only sensitive to a certain color of visible light. In the classic illustrative example, there are three emulsions: one is red sensitive, another is green sensitive, and the last is blue-sensitive. The top layer is blue-sensitive. Beneath the blue layer is a yellow filter, composed of dyes or colloidal silver. All silver-based photographic emulsions have some sensitivity to blue light, regardless of what other colours they may be sensitised for. This filter layer serves to remove the blue light, which would expose the layers beneath it. Beneath the blue-sensitive layer and the yellow filter are the green and red sensitive layers.
The illustrative example outlined above differs from the design of actual film, in respect to the number of layers. Almost all C-41 films contain multiple layers sensitive to each colour. Each of these layers have different speed and contrast characteristics, allowing the film to be correctly exposed over a wider range of lighting conditions.
In addition to multiple emulsion layers, real films have other layers that are not sensitive to light. Some films are top-coated with UV blocking layers or anti-scratch coatings. There also may be layers to space different emulsions, or additional filter layers.
C-41 Processing can not be done on TRUE black and white negatives.
Each emulsion layer, in addition to the light-sensitive components, contain chemicals called dye couplers. These couplers, located in the blue, green and red-sensitive layers, produce yellow, magenta and cyan dyes, respectively, when developed. Process
The C-41 process is the same for all C-41 films, although different manufacturers' processing chemistry's vary slightly.
After exposure, the film is developed in a "colour developer". The developing ingredient is a paraphernalia diamine-based chemical known as CD-4. The developer develops the silver in the emulsion layers. As the silver is developing, oxidised developer reacts with the dye couplers, resulting in formation of dyes.
The control of temperature and agitation of the film in the developer is critical in obtaining consistent, accurate results. Incorrect temperature can result in severe colour shifts or significant under or over-development of the film.
After the developer, a bleach removes the metallic silver generated by development. After the bleach, a fixer removes the unexposed undeveloped silver halide. This is followed by a wash, and a final stabiliser and rinse to complete the process.
There are simplified versions of the process that use a combined bleach-fix that dissolves the silver generated by development and removes undeveloped silver halide. These are not used by commercial C-41 processors, and are marketed for home or field use.
Brief:
Decisive moment,
Juxtapostion,
Visual irony,
Depth of field,
Composition and suggestion.
Opportunity e.g. spontaneity.

Martin Parr.
Tony Ray Jones.

| ! | ||
WEEK : 8
This week we showed are pictures of ' Great British '.


WEEK : 9
This week we talked about histograms and photoshop. this weeks brief is:
. Us at least 10 tools from photoshop and apply this to a image than upload it to flickr.
Cropping - improving composition or reformatting
Levels – for image brightness, shadows and highlights
Layers – so actions can be separated for control
Curves – to control contrast
B/W conversion
White balance – to create or remove colour bias
Resize – image dimensions and resolution
Image mode/ bit depth – Duotones, changing the bit depth
File types – different files for different functions
Selections and feathering - for targeting specific areas or zones
Dodging and burning – to lighten or darken areas of an image
Creative Borders
Cloning tool/ healing brush– to repair unwanted marks or pixels
Sharpening – making an image appear sharper
Gradient tool – give a sky or similar a smooth tone
Prepare for print
• 300dpi
• Sized
• Aspect ratio
• Tiff
• SRGB.

Sunflower image

Histogram of Sunflower image
An image histogram is a type of histogram that acts as a graphical representation of the tonal distribution in a digital image. It plots the number of pixels for each tonal value. By looking at the histogram for a specific image a viewer will be able to judge the entire tonal distribution at a glance.
Image histograms are present on many modern digital cameras. Photographers can use them as an aid to show the distribution of tones captured, and whether image detail has been lost to blown-out highlights or blacked-out shadows.[2]
The horizontal axis of the graph represents the tonal variations, while the vertical axis represents the number of pixels in that particular tone. The left side of the horizontal axis represents the black and dark areas, the middle represents medium grey and the right hand side represents light and pure white areas. The vertical axis represents the size of the area that is captured in each one of these zones. Thus, the histogram for a very bright image with few dark areas and/or shadows will have most of its data points on the right side and center of the graph. Conversely, the histogram for a very dark image will have the majority of its data points on the left side and center of the graph
week: 10
This week we put are Images on flickr. We were told to use 10 tool from photo shop I only used 7 . I was really glad I had a push in to editing.
